18 RStudio Projects
This Chapter is adapted from the book R for Data Science.123
18.1 Overview
One of the first steps of every workflow should be to set up a “Project” within RStudio. A Project is the home for all of the files, images, reports, and code that are used in any given project.
Note that when we capitalize the word “Project”, we’re referring to a specific setup within RStudio, while we refer to general projects that you might work on with the lowercase “project”.
We use Projects because they create a self-contained folder for a given analysis in R. This means that if you want to share your Project with a colleague, they will not have to reset file paths (or even know anything about file paths!) in order to re-run your analysis. Furthermore, even if the only person you ever collaborate with is a future version of yourself, using a Project for each of your analyses will mean that you can move the Project folder around on your computer, or even move it to a new computer, and remain confident that the analysis will run in the future (at least in terms of file path structures).
One day you will need to quit R, go do something else and return to your analysis the next day. One day you will be working on multiple analyses simultaneously that all use R and you want to keep them separate. One day you will need to bring data from the outside world into R and send numerical results and figures from R back out into the world.
To handle these real life situations, you need to make two decisions:
What about your analysis is “real”, i.e. what will you save as your lasting record of what happened?
Where does your analysis “live”?
18.2 What is real?
As a beginning R user, it’s OK to consider your environment (i.e. the objects listed in the environment pane) “real”. However, in the long run, you’ll be much better off if you consider your R scripts as “real”.
With your R scripts (and your data files), you can recreate the environment. It’s much harder to recreate your R scripts from your environment! You’ll either have to retype a lot of code from memory (making mistakes all the way) or you’ll have to carefully mine your R history.
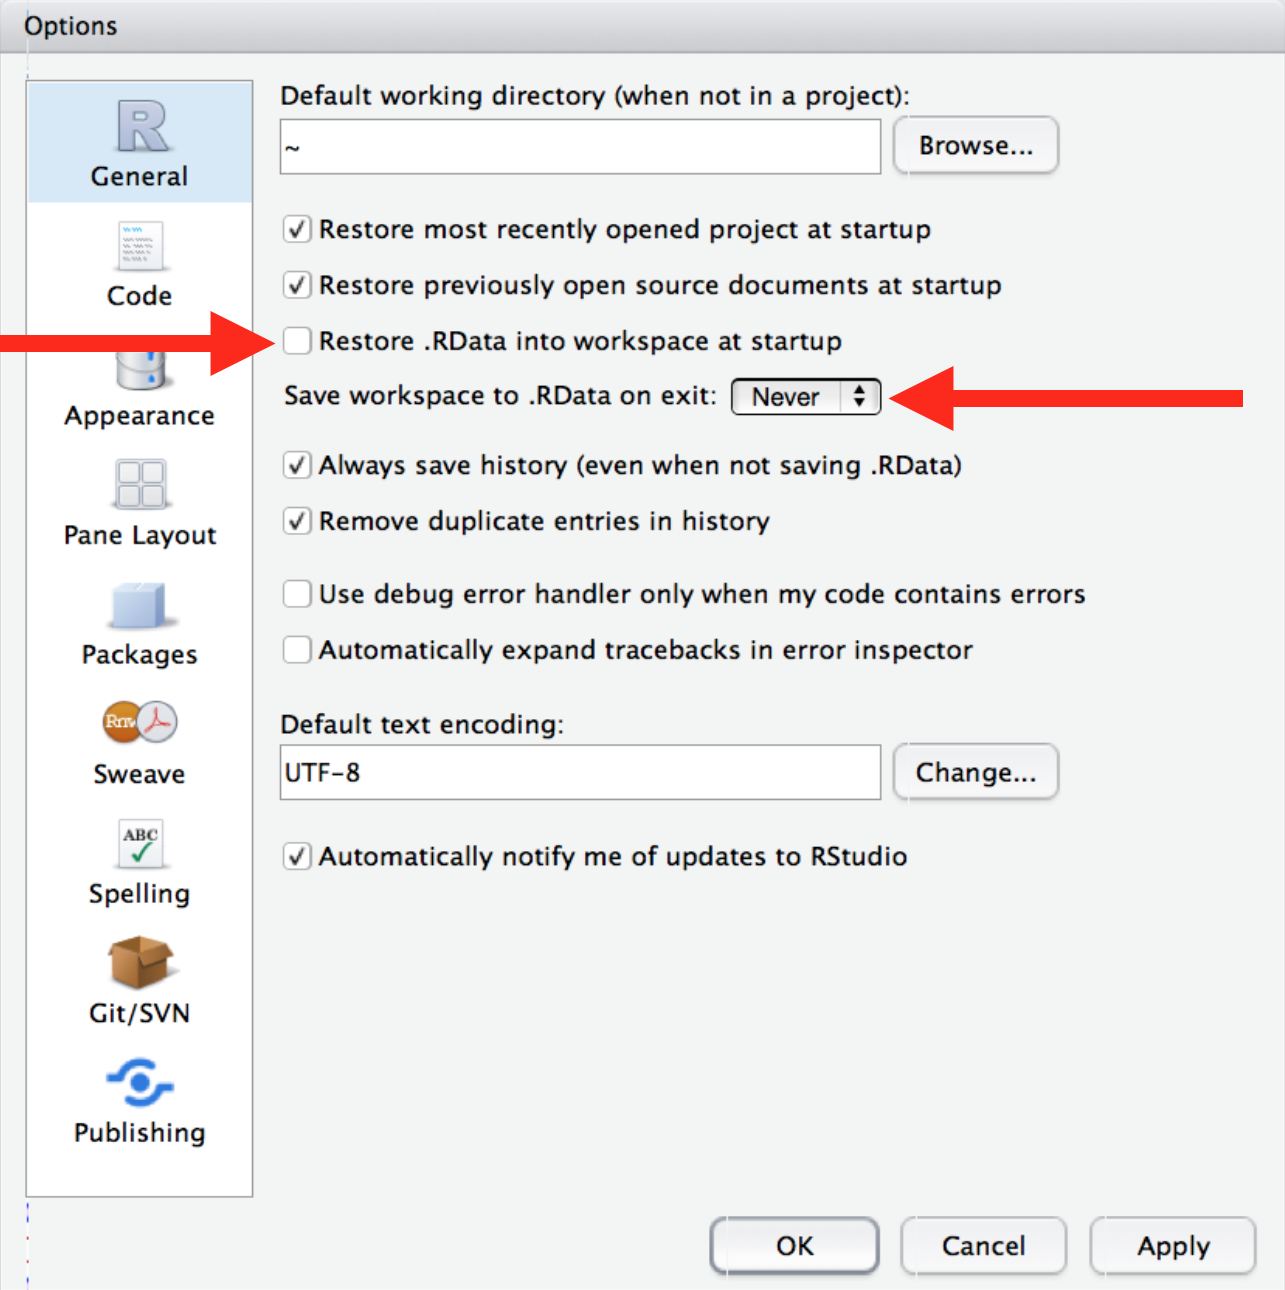
To foster this behaviour, I highly recommend that you instruct RStudio not to preserve your workspace between sessions:

This will cause you some short-term pain, because now when you restart RStudio it will not remember the results of the code that you ran last time. But this short-term pain will save you long-term agony because it forces you to capture all important interactions in your code. There’s nothing worse than discovering three months after the fact that you’ve only stored the results of an important calculation in your workspace, not the calculation itself in your code.
There is a great pair of keyboard shortcuts that will work together to make sure you’ve captured the important parts of your code in the editor:
- Press Cmd/Ctrl + Shift + F10 to restart RStudio.
- Press Cmd/Ctrl + Shift + S to rerun the current script.
I use this pattern hundreds of times a week.
18.3 Where does your analysis live?
R has a powerful notion of the working directory. This is where R looks for files that you ask it to load, and where it will put any files that you ask it to save. RStudio shows your current working directory at the top of the console:

And you can print this out in R code by running getwd():
getwd()
#> [1] "/Users/runner/work/EPIB607/EPIB607"
Evan as a beginning R user you should organize your analytical projects into directories and, when working on a project, setting R’s working directory to the associated directory.
I do not recommend it, but you can also set the working directory from within R:
setwd("/path/to/my/CoolProject")But you should never do this because there’s a better way; a way that also puts you on the path to managing your R work like an expert.
18.4 Paths and directories
Paths and directories are a little complicated because there are two basic styles of paths: Mac/Linux and Windows. There are three chief ways in which they differ:
The most important difference is how you separate the components of the path. Mac and Linux uses slashes (e.g.
plots/diamonds.pdf) and Windows uses backslashes (e.g.plots\diamonds.pdf). R can work with either type (no matter what platform you’re currently using), but unfortunately, backslashes mean something special to R, and to get a single backslash in the path, you need to type two backslashes! That makes life frustrating, so I recommend always using the Linux/Mac style with forward slashes.Absolute paths (i.e. paths that point to the same place regardless of your working directory) look different. In Windows they start with a drive letter (e.g.
C:) or two backslashes (e.g.\\servername) and in Mac/Linux they start with a slash “/” (e.g./home/sahir/). You should never use absolute paths in your scripts, because they hinder sharing: no one else will have exactly the same directory configuration as you.The last minor difference is the place that
~points to.~is a convenient shortcut to your home directory. For example~/git_repositories/is equivalent to/home/sahir/git_repositories. Windows doesn’t really have the notion of a home directory, so it instead points to your documents directory.
18.5 How to create an RStudio Project
R experts keep all the files associated with a project together — input data, R scripts, analytical results, figures. This is such a wise and common practice that RStudio has built-in support for this via Projects.
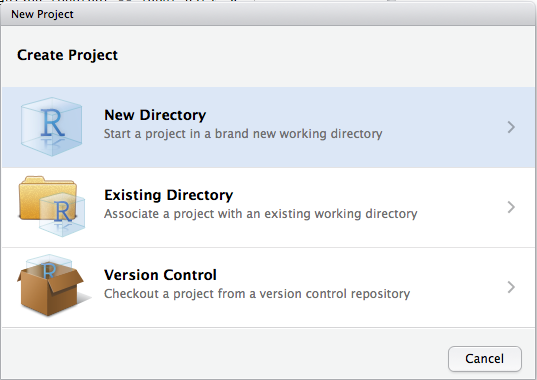
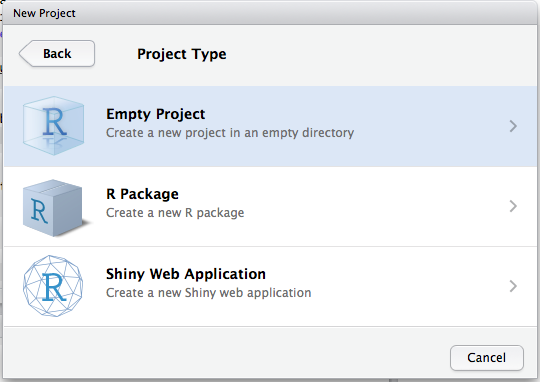
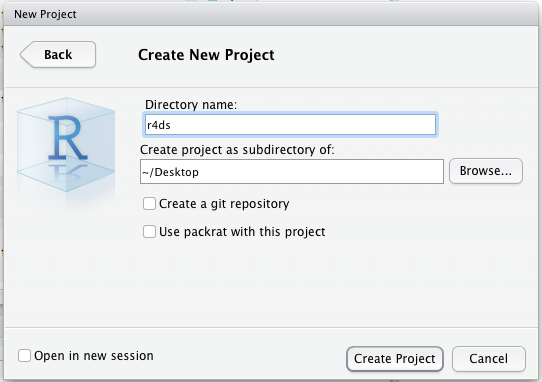
Let’s make a Project: Click File > New Project, then:


Call your Project r4ds and think carefully about which subdirectory you put the project in.
If you don’t store it somewhere sensible, it will be hard to find it in the future!
For EPIB607, I highly recommend creating a new Project for each assignment
Once this process is complete, you’ll get a new RStudio Project. Check that the “home” directory of your project is the current working directory:
getwd()
#> [1] /home/sahir/git_repositories/r4ds
Whenever you refer to a file with a relative path it will look for it here.
Now enter the following commands in the script editor, and save the file, calling it “diamonds.R”. Next, run the complete script which will save a PDF and CSV file into your project directory. Don’t worry about the what the script is actually doing, you’ll learn about them throughout the course and EPIB613.
library(tidyverse)

ggplot(diamonds, aes(carat, price)) +
  geom_hex()
ggsave("diamonds.pdf")

write_csv(diamonds, "diamonds.csv")
Quit RStudio.
Inspect the folder associated with your Project — notice the .Rproj file.
Double-click that file to re-open the Project.
Notice you get back to where you left off: it’s the same working directory and command history, and all the files you were working on are still open.
Because you followed my instructions above, you will, however, have a completely fresh environment, guaranteeing that you’re starting with a clean slate.
In your favorite OS-specific way, search your computer for diamonds.pdf and you will find the PDF (no surprise) but also the script that created it (diamonds.R).
This is a huge win!
One day you will want to remake a figure or just understand where it came from.
If you rigorously save figures to files with R code and never with the mouse or the clipboard, you will be able to reproduce old work with ease!
18.6 Summary
In summary, RStudio Projects give you a solid workflow that will serve you well in the future:
Create an RStudio Project for each data analysis project.
Keep data files there; we’ll talk about loading them into R in [data import].
Keep scripts there; edit them, run them in bits or as a whole.
Save your outputs (plots and cleaned data) there.
Only ever use relative paths, not absolute paths.
Everything you need is in one place, and cleanly separated from all the other projects that you are working on.